- Get link
- X
- Other Apps

As we have discussed in our earlier posts, basically, there
are two types of yarn (decided arbitrarily though..!!) that we crochet with. Regular yarn (any fiber) and thread yarn ( mostly cotton ). Thread is particularly used to make doilies, table
runners and other intricate home décor items. Many crocheters are hesitant to
work with thinner yarn such as thread, mostly because, many of them find it too
fiddly to work with and also because you have to use hooks of much smaller size
(0.3 mm to 1.75 mm) which are slightly different (in terms of length ) than
regular yarn hooks. I prefer to work with what is known as “Steel Crochet
Hooks”, these hooks are specifically designed to work with threads.
But in fact, it is fun to work with cotton crochet thread and
steel hook; it’s like an acquired taste you may say..!! The more you crochet
with thread, the more you will love to work with it.
Crochet thread comes in many sizes from size 3 to size 100
(diameter is inversely proportional to number, i.e. size 3 thread has thicker
diameter than that of size 10). Size 10 crochet thread is the most commonly
used (classic option) thread and
corresponding steel hook used with it, is 1.50 mm.
When you think of thread, you automatically relate it to
doily but it doesn’t have to be that way..!! You can crochet any item with
thread that you can crochet with yarn. Of course, it may be time consuming and
you will require lot of patience, but you can crochet anything with thread.
Also when working with thread, you have to pay more
attention to your tension, you have to work little tighter when you are working
with thread (ignore if you already are a tight crocheter..!!!) but not so
tight that you may find hard to move through the loops. But yes, you have
to work tighter than your regular yarn.
I am not pro at blocking but I almost always block my thread
projects with slight touch of starch. It’s a creative process.
If you are an adventurous beginner but are still hesitant to
work with thread, you can try my following free coaster pattern. It is lacy,
it is vintage and yes, it is adventurous.. This pattern was worked up in the
little time I get during my every day train journey that I take to reach
my work place.
Eight Petal Lotus ~ A free Coaster Pattern


The Lotus flower is considered sacred in most of the Indian
religions, lotus is also one of the eight auspicious signs of Buddhism and
Hinduism, the eight petals of the white lotus correspond to the Noble Eightfold
Path of the Good Law. Also, Eight petal lotus (Astadala Padma) is the
foundation of Indian Meditation Philosophy and is based on the wheel of time
(Kaal Chakra). This wheel is composed of eight spokes, each denoting an
eightfold path. This is my humble attempt at replicating this beautiful lotus flower.
Material Required:
Any size 10 crochet thread, I used a little thinner than
size 10 though.
1.5 mm hook
Tapestry needle for weaving thread
Scissors
Level:
Intermediate Beginner
Gauge:
Gauge is not very critical in this pattern but after round 9
the motif measures around 3 inches.
Finished Size:
Finished size before blocking around 4 and 1/2 inches.
Abbreviation and stitch guide (US terms):
st(s) stitch(es)
ch (chain)
sp (space)
yo (yarn over)
ss (slip stitch)
sc (single crochet)
dc (double crochet)
bl (back loop)
bl (back loop)
fpdc2tog (front post double crochet 2 together) –yo, insert
the hook around the post of indicated st (front to back), yo, draw up loop, yo,
pull through 2 loops (2 loops on the hook), yo, insert the hook around the same
stitch, yo, draw up a loop, yo, pull through 2 loops (3 loops on the hook), yo,
pull through all the 3 loops.
Split 6 fptr cluster (split front post treble cluster) –
Similar to fptr6tog only difference is, it it worked around the different
stitches
fpsc (front post single crochet)
bpsc (back post single crochet)
bpsc (back post single crochet)
Pattern Notes:
*…* around - crochet asterisk marked directions around.
Ch1 does not count as stitch unless otherwise mentioned.
So lets begin…!!!
Instructions:
Start with MR, if you are not comfortable with working with
magic ring, you can chain 6 and slip stitch into the first chain to form a
ring.
Round 2: CH3 (first dc), dc in the same st, *2dc in next stitch* around. Join with SS into the third ch of ch3 (first dc). {16 dc}
Round 3: Ch1 (not counted as st), bpsc around each dc. Join with SS on to the top of first dc. {16 bpsc}

Round 5: ch3 (counted as first dc), dc in the same st, dc in the next st, 2dc in the next st, ch2, * 2dc in the next st, dc in the next st, 2dc in the next st, ch2* around. Join with SS into the third ch of ch3. {40 dc, 8 ch2 sp}
Round 6: ch3 (counted as first dc), dc in the same st, dc in the next 3 st, 2dc in the next st, ch2, * 2dc in the next st, dc in the next 3 sts, 2dc in the next st, ch2* around. Join with SS into the third ch of ch3. {56 dc, 8 ch2 sp}
Round 7: Ch1 (not counted as st), *fpdc2tog around the post of first dc two rounds below (round 5), skip first dc, sc in the next 2 dc, fpdc2tog around the post of third dc two rounds below, skip next dc, sc in the next 2 dc, fpdc2tog around the post of last dc two rounds below, 3sc in the ch2 space*around. Join with SS on the top of first fpdc2tog. {24 fpdc2tog, 56 sc}
Round 8: ch3 (counted as first dc), dc in the next 6 st, 2dc in the next st, dc in the next st, 2 dc in the next st, * dc in the next 7 stitches, 2dc in the next st, dc in the next st, 2 dc in the next st* around. Join with SS into the third ch of ch3. {96 dc}

Note: Third loop can be found behind the stitch, though this is optional i.e. you can work through back loop only but you get holes when you work through back loop only especially when the stitches are raised or longer as we are working sc, you can work through back loop only. I like the sleek look when you work through back and third loop so I crochet through both the loops. Just a matter of personal choice.
Round 9: Ch1 (not counted as st), sc in the same st, sc in the next 2 stitches, *Split 6 fptr cluster around three fpdc2tog two rounds below (2 fptr around first fpdc2tog leaving one loop each on the hook, next 2 fptr around second fpdc2tog leaving one loop each on the hook, next 2 fptr around third fpdc2tog leaving one loop each on the hook (total no. of loops on the hook - 7), yo and pull through all), skip one stitch, sc in next 11 dc* around. For last repeat, you will have 3 stitches short which have already been worked in the beginning. Join with SS. {8 split fptr cluster, 88 sc}

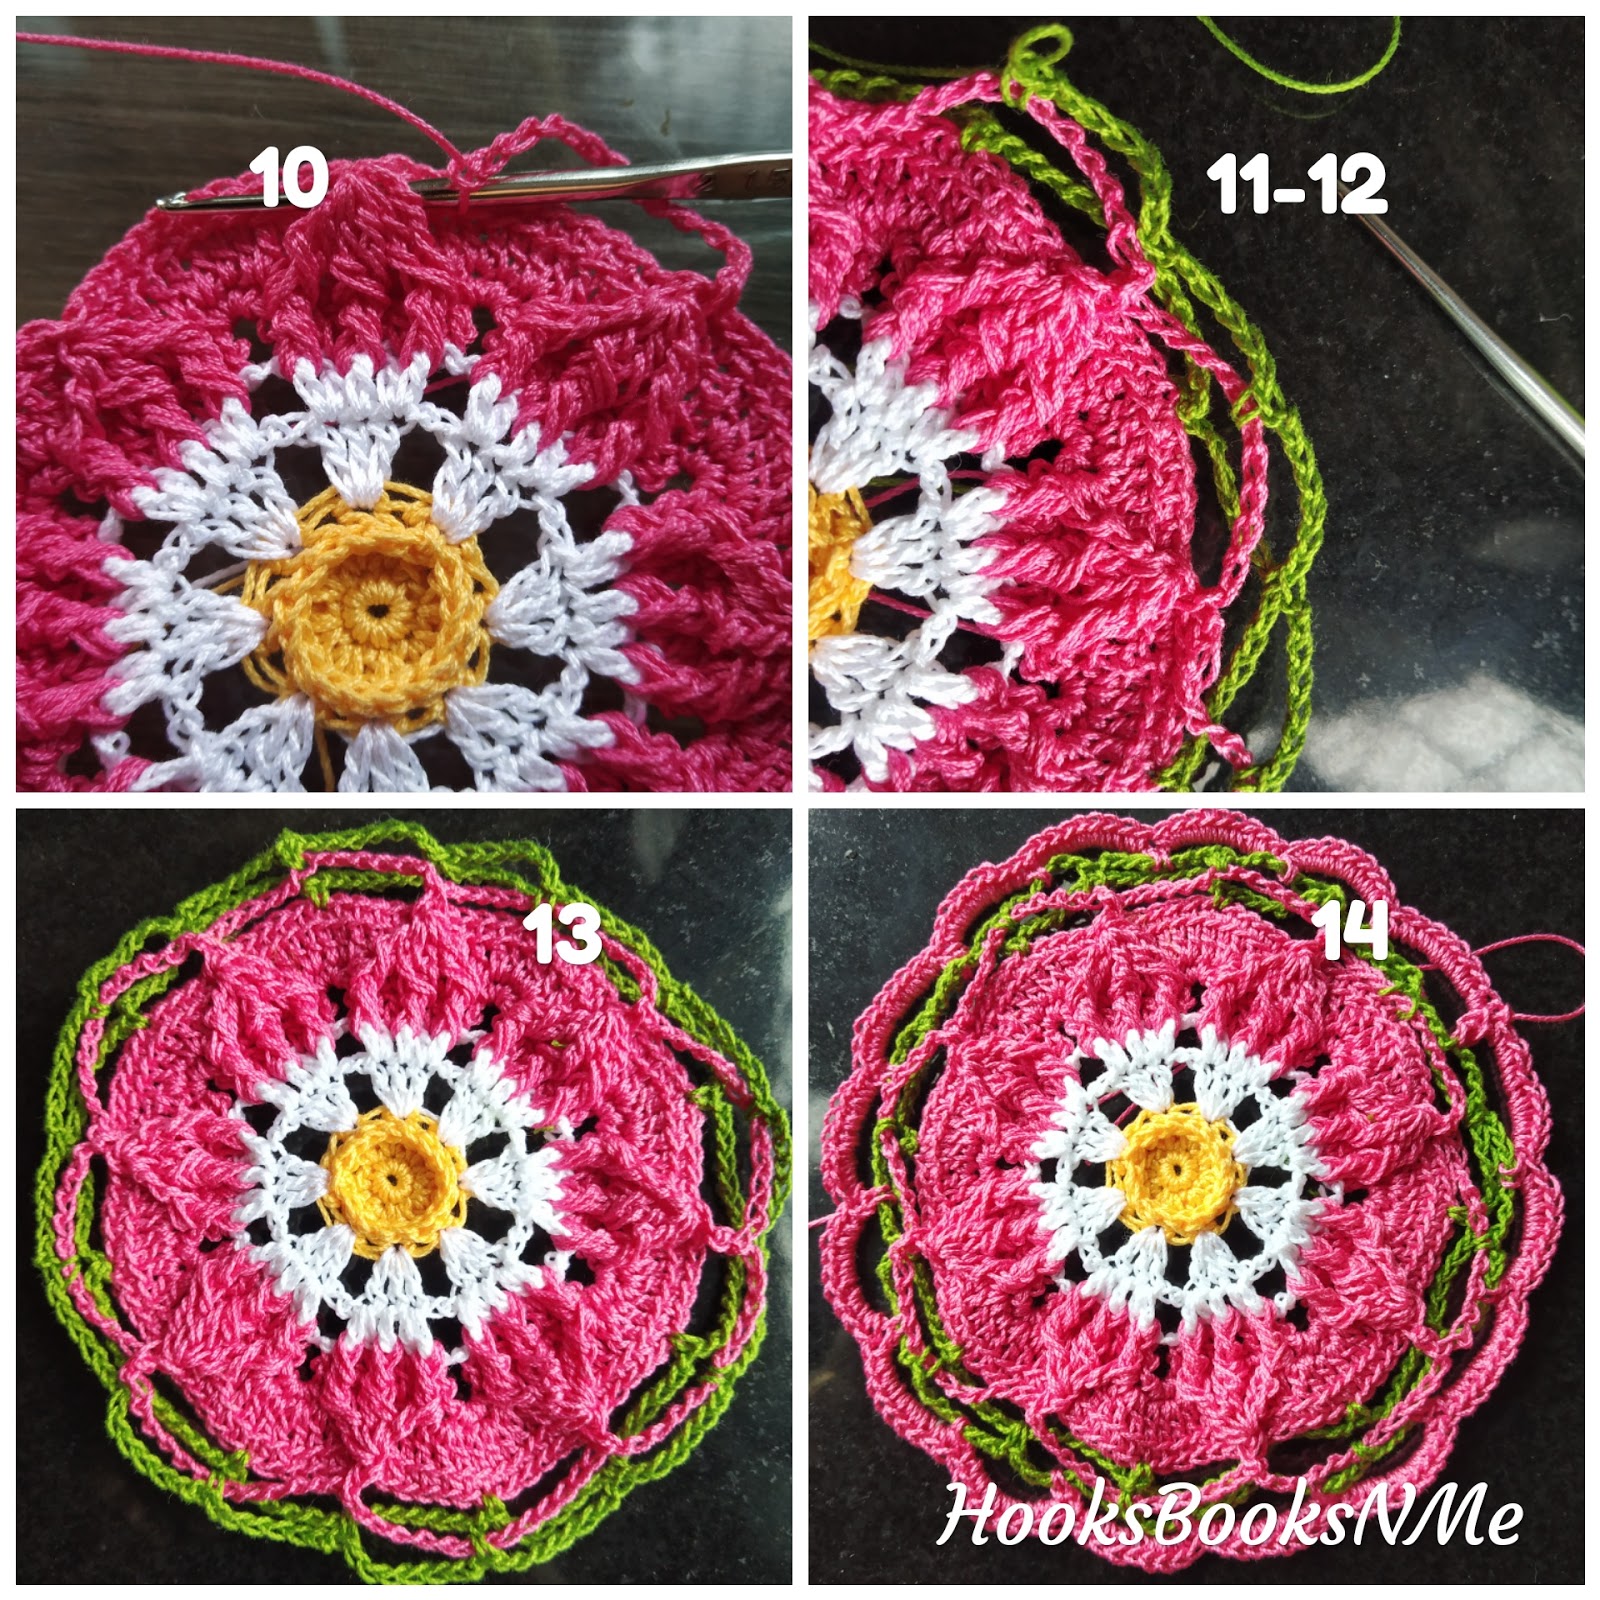
Round 11: Join with standing sc in the sixth sc of 11 sc group (between 2 split fptr clusters) from round 9, ch13, *skip 11 sts, sc in the next st, ch13* around. Join with SS on to the top of first sc. Fasten off, weave in the ends. {8 sc, 8 ch13 sp}
Round 12: Join with standing sc in any ch11 sp from round 11, *ch7, sc in next ch11 sp from round 10, ch7, sc in next ch11 sp from round 11*around. Join with SS on to the top of standing sc. Fasten off, weave in the ends. {16 sc, 16 ch7 sp}
Round 13: Join with standing sc in any ch7 sp, *ch7, sc in next ch7 sp*around. Join with SS on to the top of standing sc. {16 sc, 16 ch7 sp}
Round 14: Ch1 (not counted as st), *9 sc in ch7 sp, skip sc* around. Join with SS on to the top of first sc. Fasten off. {144 sc}

Block your coaster with diluted liquid
starch for better results.
Hope you will enjoy making these little coasters as much I enjoy designing them.
That's all for the day..!! And now for today's WoW (Words of Wisdom)
Following quote is taken from "Rise Up and Salute the Sun" by Suzy Kassem. She is such a prolific writer, I like to read her work. Mysticism and wisdom flows through her veins.... One of her quote, "Nothing truly dies. All energy simply transforms.." is one of my favorite.

Following quote is taken from "Rise Up and Salute the Sun" by Suzy Kassem. She is such a prolific writer, I like to read her work. Mysticism and wisdom flows through her veins.... One of her quote, "Nothing truly dies. All energy simply transforms.." is one of my favorite.

Whichever holidays you are enjoying in your part of the world (Summer/Winter), always be like a Lotus flower.
Love,
Love,
Jk
Life is worth living, it's about being happy anyways...!!!
Happy Holidays. Happy Crocheting.
pretty job
ReplyDelete